Playout history
On the History menu, the Playout History page enables you to view a list of files played within a specific date and time range. This page is designed to help your station prepare reports for music royalty collection societies and regulatory agencies.
Search results can be copied to the clipboard using the Copy button, exported as data in CSV format (comma separated values), exported as a document in PDF format, or displayed in a printer-friendly format using the Print button. (Your web browser must have an Adobe Flash plugin installed for these buttons to appear). Press the Esc key to return to the LibreTime interface once the print job is complete.
This page has three tabs: Log Sheet, File Summary and Show Summary. On any of these tabs, you can select a date and time range by clicking the calendar and clock icons in the upper left corner of the page. Then click the search button, which has a magnifying glass icon, to the right. A list of files played during that date and time range will appear further down the page.
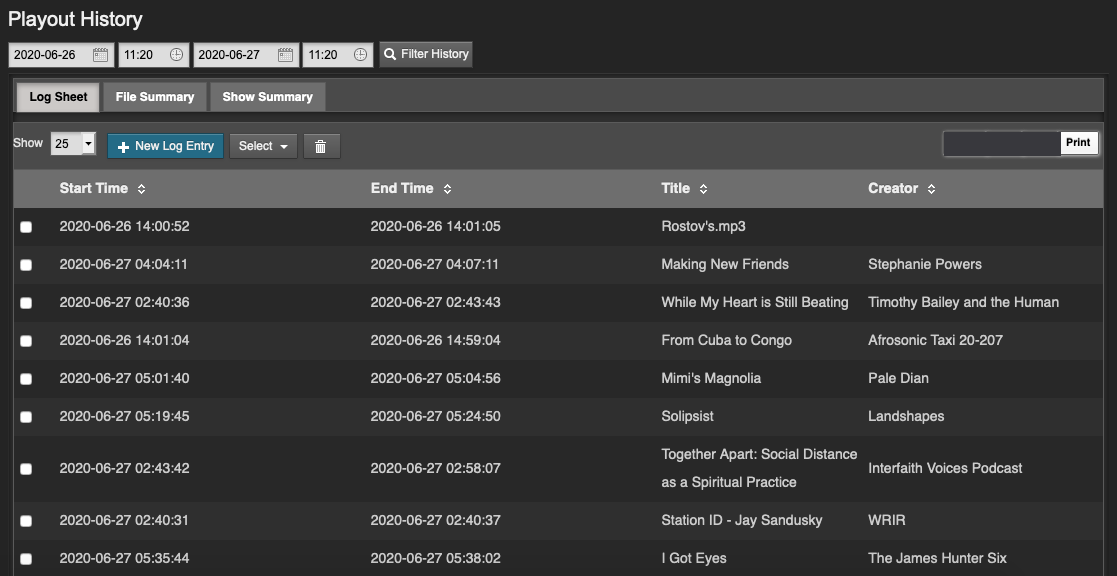
In the Log Sheet tab, the playout history is sorted by Start Time and End Time by default.
The number of times each file was played and the length of the files are shown in the File Summary tab. To make optimal use of this feature for royalty reporting purposes, music files must be tagged with Composer and Copyright metadata. The artist performing a piece of music may not be the original composer of the work, or the copyright holder of the sound recording.
On the Show Summary tab, click the name of a show within the search range to expand its row and see its playout details.
Manual logging
If your station features playout from analogue sources such as turntables or microphones, there is no automatic metadata for LibreTime to collect from these inputs. To ensure that the playout history is complete, you can add log entries manually by clicking the + Create Entry button. This action opens a pop-up window with default fields of Start Time, End Time, Title and Creator. Click the Find button to automatically fill the Choose Show Instance menu with the names of shows that took place within the specified time range. Then click the Save button to enter the new item into the playout history.
Log entries can also be manually deleted, using the button with the trashcan icon, to the right of the + Create Entry button. Pages of entries can be selected for deletion using the Select drop-down menu.
History templates
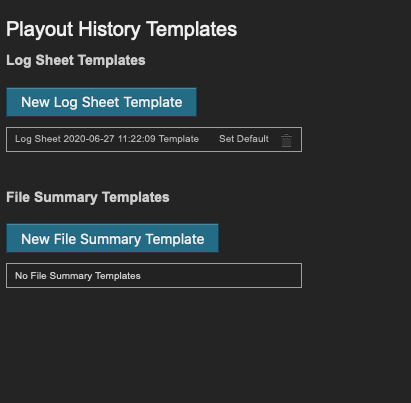
The History Templates page on the History menu enables you to prepare reports with the exact content required by regulatory agencies in the territories that you are broadcasting to. You can begin creating a custom template by clicking the button New Log Sheet Template or the button New File Summary Template.
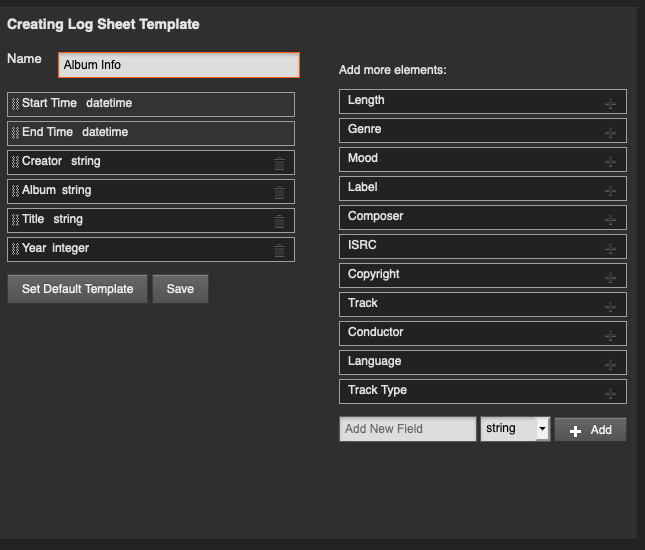
Either of these actions opens a page in which you can name the new template, and add or remove elements from the list on the left. To add a new element from the list on the right, click the plus icon for the item you require. If the element you require isn't listed, you can use the Add New Field box at the lower end of the right side column. Select string, boolean, integer, or float, depending on the type of data that you wish to log, and then click the + Add button.
When the template is in the format you require, click the Save button, and Set Default Template if you wish. The new template will now be listed on the History Templates page. If you have set a new default template, any changes will be visible on the tabs of the Playout History page.
Exporting the schedule
LibreTime has a feature which enables your station's show and schedule information to be displayed on remote websites. This feature is included in LibreTime because you would not usually invite the general public to access your LibreTime server directly. If you had very large numbers of people requesting data from the LibreTime server at once, the burst of network traffic might overload the server, potentially disrupting your broadcasts. If carried out maliciously, this network overload is known as a denial of service attack.
Instead, your public-facing web server can retrieve the schedule information from the LibreTime API. It can be presented using Javascript widgets and styled with CSS, in any format that you require.
There are two kinds of information that can be retrieved remotely from the LibreTime API without authentication; the metadata for the current show plus the following show (live-info), or the schedule for the current week and the week ahead (week-info). The week-info metadata includes show names, times, and individual show URLs on your public website. That way, the audience for your station can click through from the schedule information to find out more about a particular show, or download a previous show recording that you might have made available.
If your LibreTime server was accessible at https://libretime.example.org the live show information could be retrieved by your web server using this URL:
https://libretime.example.org/api/live-info/?callback
The comma-separated text metadata returned to your web server might be something like this:
{
  "env": "production",
  "schedulerTime": "2013-07-03 14:07:31",

  "previous": {
    "name": "Earth, Wind & Fire - Boogie Wonderland",
    "starts": "2013-07-01 22:53:00",
    "ends": "2013-07-01 22:55:00",
    "type": "track"
  },
  "current": {
    "name": "Deodato - Also Sprach Zarathustra",
    "starts": "2013-07-03 13:07:06",
    "ends": "2013-07-03 13:16:05",
    "media_item_played": true,
    "record": 0,
    "type": "track"
  },

  "next": {
    "id": 8,
    "instance_id": 10,
    "name": "Rock Show",
    "url": "https://rock.example.com/",
    "start_timestamp": "2013-07-03 14:00:00",
    "end_timestamp": "2013-07-03 15:00:00",
    "starts": "2013-07-03 14:00:00",
    "ends": "2013-07-03 15:00:00",
    "record": 0,
    "type": "show"
  },

  "currentShow": [
    {
      "start_timestamp": "2013-07-03 14:07:00",
      "0": "2013-07-03 13:07:00",
      "end_timestamp": "2013-07-03 15:00:00",
      "1": "2013-07-03 14:00:00",
      "name": "Funk Show",
      "2": "Funk Show",
      "id": 7,
      "3": 7,
      "instance_id": 9,
      "4": 9,
      "record": 0,
      "5": 0,
      "url": "https://funk.example.com/",
      "6": "",
      "starts": "2013-07-03 14:07:00",
      "7": "2013-07-03 13:07:00",
      "ends": "2013-07-03 15:00:00",
      "8": "2013-07-03 14:00:00"
    }
  ],

  "nextShow": [
    {
      "id": 8,
      "instance_id": 10,
      "name": "Rock Show",
      "url": "https://rock.example.com/",
      "start_timestamp": "2013-07-03 15:00:00",
      "end_timestamp": "2013-07-03 16:00:00",
      "starts": "2013-07-03 15:00:00",
      "ends": "2013-07-03 16:00:00",
      "record": 0,
      "type": "show"
    }
  ],

  "timezone": "BST",
  "timezoneOffset": "3600",
  "AIRTIME_API_VERSION": "1.1"
}
The information for the current week's schedule could be retrieved using the URL:
https://libretime.example.org/api/week-info/?callback
In this case, the metadata returned would be in a different format from the above example, something like the following. To keep the example short, this particular schedule export only contains four shows on a Monday. A full weekly schedule export would contain a great deal more text.
{
  "monday": [
    {
      "start_timestamp": "2013-07-01 12:05:00",
      "end_timestamp": "2013-07-01 13:00:00",
      "name": "Elvis Show",
      "id": 2,
      "instance_id": 2,
      "record": 0,
      "url": "https://elvis.example.com/",
      "starts": "2013-07-01 12:05:00",
      "ends": "2013-07-01 13:00:00"
    },

    {
      "start_timestamp": "2013-07-01 13:00:00",
      "end_timestamp": "2013-07-01 14:00:00",
      "name": "News",
      "id": 3,
      "instance_id": 4,
      "record": 0,
      "url": "https://news.example.com/",
      "starts": "2013-07-01 13:00:00",
      "ends": "2013-07-01 14:00:00"
    },

    {
      "start_timestamp": "2013-07-01 14:00:00",
      "end_timestamp": "2013-07-01 15:00:00",
      "name": "Funk Show",
      "id": 4,
      "instance_id": 6,
      "record": 0,
      "url": "https://funk.example.com/",
      "starts": "2013-07-01 14:00:00",
      "ends": "2013-07-01 15:00:00"
    },

    {
      "start_timestamp": "2013-07-01 15:00:00",
      "end_timestamp": "2013-07-01 17:30:00",
      "name": "Rock Show",
      "id": 5,
      "instance_id": 7,
      "record": 0,
      "url": "https://rock.example.com/",
      "starts": "2013-07-01 15:00:00",
      "ends": "2013-07-01 17:30:00"
    }
  ],

  "tuesday": [],
  "wednesday": [],
  "thursday": [],
  "friday": [],
  "saturday": [],
  "sunday": [],
  "AIRTIME_API_VERSION": "1.1"
}
If you see the message You aren't allowed to access this resource when attempting to display schedule information in your web browser, log in to the LibreTime administration interface, click System in the main menu, then Preferences. Set Allow Remote Websites To Access "Schedule" Info? to Enabled, click the Save button, then refresh the browser window opened on the schedule export URL. If you don't wish to make schedule information available to the public, set this option to Disabled instead.
Caching schedule information
If the LibreTime server is behind a firewall, or you want to protect the LibreTime server from large numbers of schedule requests, you may wish to cache the schedule information on a public-facing or intermediate server. You can then create a firewall rule that only allows the schedule server to connect to the LibreTime server, in addition to any remote users of the LibreTime web interface.
Your system administrator can set up schedule caching on a standard Apache and PHP enabled web server with the curl program installed, using the following steps:
- Create a shell script on the schedule server (schedule.example.com) that polls the remote LibreTime server (libretime.example.org), and writes the metadata returned into a pair of local temporary files:
sudo nano /usr/local/bin/libretime-schedule.sh
The content of this file should be like the following script, replacing libretime.example.org with the name of your LibreTime server:
#!/bin/sh

curl -s "https://libretime.example.org/api/live-info/?callback=***" > /tmp/live-info

curl -s "https://libretime.example.org/api/week-info/?callback=***" > /tmp/week-info
- Make the script executable:
sudo chmod +x /usr/local/bin/libretime-schedule.sh
- Create an Apache VirtualHost configuration for the schedule server:
sudo nano /etc/apache2/sites-available/schedule
containing a definition like the following, replacing schedule.example.com with the name of your schedule server:
    <VirtualHost *:80>
       ServerName schedule.example.com
       DocumentRoot /var/www/schedule/
    </VirtualHost>
- In the schedule server's DocumentRoot folder, create the folders
api/live-info/andapi/week-info/
sudo mkdir -p /var/www/schedule/api/live-info/
sudo mkdir -p /var/www/schedule/api/week-info/
- Create an index.php file in the
api/live-info/folder:
sudo nano /var/www/schedule/api/live-info/index.php
containing the following code:
<?php
$filename = '/tmp/live-info';  // define here the path and name of uploaded live-info file

header('Content-Type: text/javascript');
header("Expires: Thu, 01 Jan 1970 00:00:00 GMT");
header("Cache-Control: no-store, no-cache, must-revalidate");

$callback = empty($_GET['callback']) ? null : $_GET['callback'];
$content = file_get_contents($filename);
$content = str_replace('***', $callback, $content);
echo $content;
?>
- Create an index.php file in the
api/week-info/folder:
sudo nano /var/www/schedule/api/week-info/index.php
containing the following code:
<?php
$filename = '/tmp/week-info';  // define here the path and name of uploaded week-info file

header('Content-Type: text/javascript');
header("Expires: Thu, 01 Jan 1970 00:00:00 GMT");
header("Cache-Control: no-store, no-cache, must-revalidate");

$callback = empty($_GET['callback']) ? null : $_GET['callback'];
$content = file_get_contents($filename);
$content = str_replace('***', $callback, $content);
echo $content;
?>
- Enable the new configuration and reload the Apache web server:
sudo a2ensite schedule
sudo /etc/init.d/apache2 reload
- Create a cron job to run the shell script each minute:
sudo nano /etc/cron.d/libretime-schedule
containing the line:
* * * * * libretime /usr/local/bin/libretime-schedule.sh
The schedule server will now be serving the same show information as the LibreTime server, with a cache lifetime of one minute. You can adjust the cache lifetime by altering the frequency of the cron job that polls the LibreTime server.
Pushing schedule information via FTP or SSH
If there is no inbound access to the LibreTime server at all, an FTP script can be used to push cached schedule data from LibreTime to an external web server. The standard ftp command should be available on the LibreTime server and the external web server should have a suitably restricted FTP account set up. After following steps 1 and 2 above to export schedule data to a pair of temporary files on the LibreTime server, create a new script on the LibreTime server to automatically make the upload:
sudo nano /usr/local/bin/upload-schedule-data.sh
Replace host, user and password values with appropriate values for your external web server:
#!/bin/sh
HOST='website.example.com'
USER='ftp_user'
PASSWD='ftp_password'

ftp -n -v $HOST << EOT
user $USER $PASSWD
ascii
prompt
put /tmp/airtime-week-info
put /tmp/airtime-live-info
bye
EOT
Then make the new script executable and create a cron job to launch it every minute, as in step 8 above. Steps 3 to 7 above should be carried out on the external web server so that it can convert the two temporary files uploaded via FTP into public schedule data.
If you have secure shell access (SSH) to the remote web server, you could write a script to use the secure copy command (scp) instead of ftp.